Star Watcher
This article is incomplete & needs to be reviewed. You can help by creating a pull request.
This feature is currently not available for the iOS version of the OsmAnd app.
Star Watcher is currently in beta.
Overview
The Star Watcher plugin shows the star sky overlay on the map with stars, constellations, Sun, Moon and planets. The positions and paths of Sun, Moon, planets and major stars are shown on the map.
Required Setup Parameters
The following settings are required to display Star Watcher overlay:
- Enable Star Watcher plugin from the Plugins section of the Main Menu
- Use Menu → Star map to open dedicated screen with star sky, settings and time controls.
- Select time and date using the controls on the Star map screen.
- Adjust what is shown on the Star map using Configure View — for example, toggle visible objects and rendering aids.
- Tap the Close (X) button at the top of the Star map screen to exit Star map and return to the Earth map.
The plugin works with both Map rendering engines but performs best in OpenGL mode.
Star Map Screen
Go to: Enabled plugin → Menu → Star map
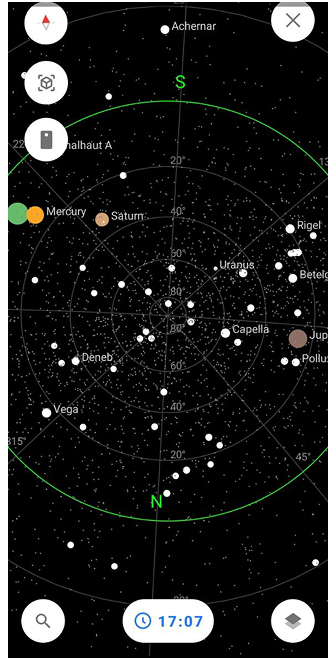
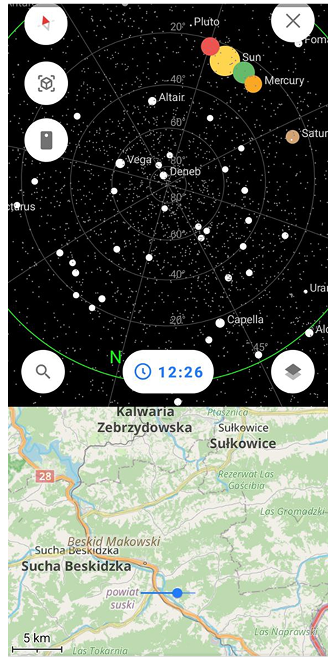
The dedicated Star map screen shows interactive celestial dome with stars, constellations, planets, Sun and Moon paths. At the bottom of the screen, you can access the following controls: Search — opens a search panel with an input field where you can type an object name. Below the field, there is a list of suggested objects in alphabetical order. You can switch the sorting between A–Z and Z–A; Time and date — lets you change the date and time to observe the sky at different moments in the past or future. This is useful for planning observations, tracking object movement, or learning how the sky changes over time; and Configure View.
- The screen renders the full sky hemisphere above your location, aligned with compass direction. The Star map can be rotated manually.
- Manual rotation of the Star map does not affect the orientation of the Earth map. The Earth map always follows the map orientation mode selected in your settings.
- Tap celestial objects for details like magnitude, rising/setting times or paths.
Celestial Object Info
Tap any star, planet, constellation, or Sun/Moon on the Star map screen or map overlay to view detailed information.
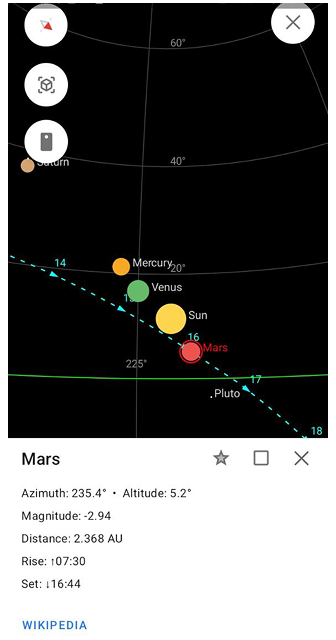
Displayed data:
- Azimuth: Direction from North (0°-360°) where the object appears in the sky
- Altitude: Height above horizon (0° at horizon, 90° at zenith)
- Magnitude: Brightness scale (-26 for Sun to +6 for faint stars; lower = brighter)
- Rise/Set times: When the object rises above/sets below horizon
- Distance (planets): Average distance from Earth in AU/km
Wikipedia integration: Tap "Wikipedia" in the info popup to open the object's page in your browser (e.g. Sirius, Orion, Venus). Works offline for cached data, online for full articles.
Long-press celestial objects to pin them as map markers with live position updates, or share coordinates for group stargazing.
This feature helps identify objects in real sky, plan observations, and learn astronomy facts directly from OsmAnd.
AR Star Finding (Camera Mode)
Go to: Enabled plugin → Menu → Star map → Camera button
The Star Watcher layer works with your device camera to enable Augmented Reality (AR) stargazing. Point your phone camera at the real night sky and see stars, planets, constellations, Sun/Moon overlaid in real-time.
How AR Star Finding works:
- Live camera view shows real sky with transparent astronomical overlays aligned to horizon/compass
- Move camera to scan sky — objects highlight when they appear in your field of view
- Tap highlighted objects to see azimuth, altitude, magnitude, rise/set times, and Wikipedia link
- Compass calibration required for accurate alignment (wave phone in figure-8 if needed)
Perfect for:
- Identifying faint stars/planets invisible to naked eye
- Locating constellations by moving phone across sky
- Real-time sky navigation during hikes or camping
Configure View
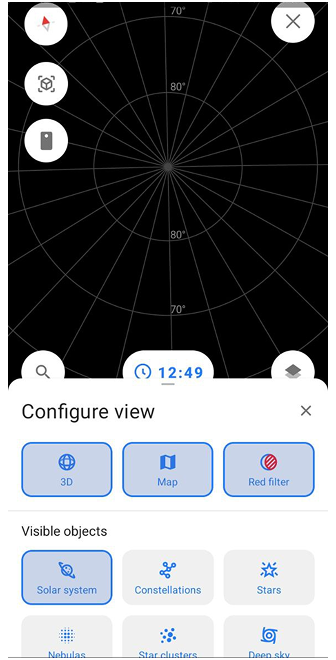
Configure View allows you to control how the Star map is displayed by enabling or disabling visual modes, objects, and rendering aids.
To open Configure View, tap the Configure View button in the bottom-right corner of the Star map screen. The button is represented by a layer-style icon (stacked shapes), indicating display and layer settings. Configure View opens in a Half state, showing the main display options. Swipe the panel upwards to expand it into Full state and access all available settings. To close Configure View, swipe the panel downwards once to return to the Half state, swipe downwards again to close it completely, or tap the Close (X) button in the top-right corner of the panel.
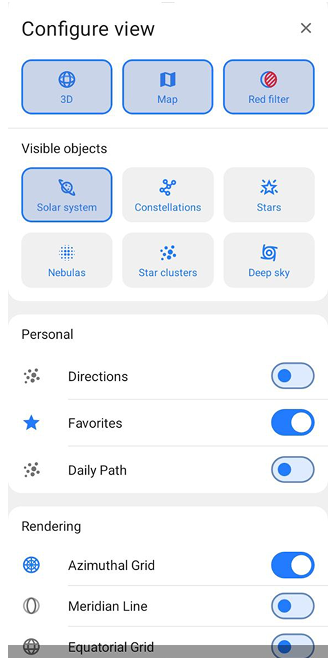
Modes and Actions
This section controls the main display modes of the Star map.
- 2D / 3D. Switches the Star map between a flat (2D) view and a globe-like (3D) view.
- Map. Enables an additional Earth map view displayed below the Star map, helping you relate celestial objects to your geographic location.
- Red filter.Applies a red color filter to the entire screen to reduce light pollution and preserve night vision during dark-sky observations.
Visible Objects
This section lets you choose which types of celestial objects are shown on the Star map.
| Object | Description |
|---|---|
| Solar system | Displays the Sun, Moon, and visible planets. |
| Constellations | Shows constellation lines and patterns formed by stars. |
| Stars | Displays individual stars visible on the Star map. |
| Nebulas | Shows nebula objects where available. |
| Star clusters | Displays star clusters as separate celestial objects. |
| Deep sky | Toggles deep-sky objects such as galaxies, galaxy clusters, and black holes. |
Personal Display Options
Personal display options control additional visual aids related to user focus and observation.
| Option | Description |
|---|---|
| Direction | Shows a directional indicator to help orient your view. |
| Daily path | Displays the daily path of selected celestial objects across the sky. |
| Favorites | Highlights or displays objects marked as favorites. |
Rendering Aids
Rendering aids add reference lines and grids to help orient the Star map.
| Aid | Description |
|---|---|
| Azimuthal grid | Adds an azimuth-based grid for horizontal sky orientation. |
| Meridian line | Displays the meridian line crossing the sky from north to south. |
| Equatorial grid | Shows the celestial equatorial coordinate grid. |
| Ecliptic line | Displays the ecliptic line representing the apparent path of the Sun. |
| Galaxy equator | Shows the equatorial plane of the Milky Way galaxy. |