Map Buttons
Overview
Map buttons, including Zoom, Search, Navigation, Compass, My Position, 3D Mode, and Menu, are the primary controls for interacting with the map. Each button offers specific functionalities to enhance your navigation and map usage experience.
My Position and Zoom

Use these buttons to control how the map is displayed on the screen of your device:
- My Position. Shows whether the center of the map is synchronized with your device's current geolocation.
- Zoom. Allows you to adjust the map's zoom level to provide more or less details. If you want more information on using these buttons, you can see the article Interact with map.
Navigation

The Navigation button is essential for route planning and navigation:
- Build a route. Use this button to create a route.
- Start navigation. Initiate turn-by-turn navigation.
- In navigation mode, the Directions button is not visible by default but appears after a short tap the map.
Indicative states of the Directions button:
- The gray default icon indicates that the route has not been created yet. Tapping this icon opens the route setup functionality.
- The blue default icon indicates the route is built, but navigation has not started yet. Tapping this icon opens the route setup functionality.
- The blue arrow icon indicates that navigation is active. Tapping this icon opens the details of the current route.
Configure Map

The Configure map button provides access to the Configure Map menu. The icon also reflects the Current app profile, allowing you to identify and switch between different profiles.
Main Menu

The Main Menu button opens the general menu, granting access to all application features. In navigation mode, this button is hidden by default and becomes visible after a short tap the map.
Search

The Search button offers quick access to the search capabilities, allowing you to find locations, points of interest, and other information directly from the map.
Compass
The Compass button indicates the orientation of the map on your device screen. For additional information, refer to the Interact with map article.
Map Orientation Modes
-

Manually rotated. In this mode, you can manually rotate the map with a two-pointer gesture (two-finger touch and rotate) according to your preference. The orientation of the map does not depend on the direction of travel or the compass of the device but is determined by you. The manual rotation mode is set by default. -

Movement direction. In this mode, the map is oriented according to the direction of your movement known from GPS data. For example, if you turn to the right, the map also rotates so that the right side of the screen corresponds to the direction of movement. For details, go to Rotate map by bearing. -

Compass direction. The icon on the button points to the actual North, and the map moves according to the compass orientation of your device. This way, the north of the map corresponds to the real north, and you can see the orientation of the map relative to the surrounding terrain. Your device should be in the most horizontal position possible. If your device does not have a compass sensor, the orientation of the map remains unchanged. -

North is up. In this mode, the map is fixed (with a hard lock) in the North direction, which is the top edge of your device. Regardless of the direction the device is moving, the map remains static, and you can see your position related to your surroundings. The map has no automatic or manual rotation.
Compass Tapping Behavior
The compass button provides multiple actions to control map orientation:
-
Single tap. A single tap of the Compass button (located in the upper left corner of the screen when visible) instantly reorients the map orientation to the North in all map orientation modes. Even if the map is in the Compass direction mode, it still rotates for a moment and then reverts to the dynamic orientation of that mode.
-
Double tap. To quickly switch between map orientation modes, such as following the GPS direction or rotating with the device, double tap the Compass button (when visible).
-
Long tap. With a long tap the Compass button (when visible) you can open a list of all map orientation modes and select the required one. This list can also be opened in the Profile settings.
Display Options
- Android
- iOS
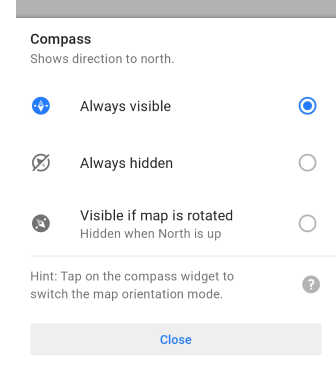
Go to: Menu → Configure screen → Buttons → Default buttons → Compass
Go to: Menu → Configure screen → Buttons → Default buttons → Compass
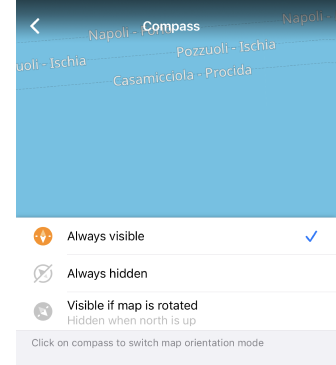
The compass icon on the button always points to the North. You can select how the compass button is displayed on the screen.
- Always visible. The button does not disappear from the screen.
- Always hidden. In this case, you cannot quickly change the map orientation, but the button will not take up space on the screen.
- Visible if the map is rotated. The button is not visible while the compass is pointing North at the top edge of your device.
3D Mode
- Android
- iOS
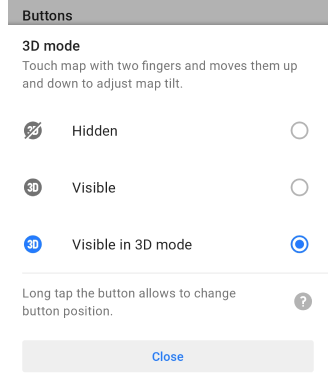
Go to: Menu → Configure screen → Buttons → Default buttons → 3D mode
Go to: Menu → Configure screen → Buttons → Default buttons → 3D mode
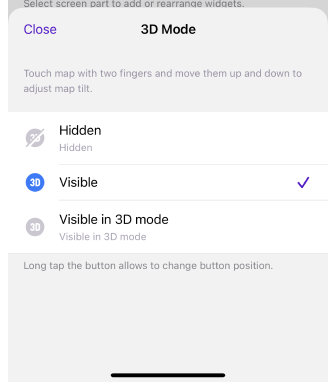
- Hidden. If this mode is selected for a button, you need to use a gesture to change the map view. Tap the map with two fingers and move them up and down to adjust the map's tilt.
- Visible. The button is always displayed on the map screen.
- Visible in 3D mode. The button is displayed on the map screen when you change the map view with a two-finger and move gesture.
Additional Settings
-
Display the button. (For Android) The setting for the 3D Mode button appears in the Configure screen list only if the map rendering engine Version 2 (OpenGL) is selected.
-
Saves the angle. After switching to 3D mode and changing the angle manually with a gesture, the angle is saved and used the next time the 3D mode is activated. This option is only saved for the profile selected at the time.
-
Moving. You can place the button anywhere on the screen of your device. To do this, hold down the button and without taking your finger off, drag it to the required place.
-
Button position. The button position on the map on the application screen is saved separately for each profile.
-
Recommendation. It is recommended to download and enable the Hillshade map for the selected region.
Custom Buttons
Quick action widget is a configurable button with various action types that could be assigned. It is also possible to have multiple Custom buttons.
Map Button Appearance
- Android
- iOS
| Default buttons | Custom buttons |
|---|---|
 |  |
Go to (for Custom buttons): Menu → Configure screen → Custom buttons → Quick action → three-dot menu → Appearance
Go to (for all Default buttons): Menu → Configure screen → Buttons → Default buttons → three-dot menu → Appearance
Go to (for a specific Default button): Menu → Configure screen → Buttons → Default buttons → select a button → Appearance
| Default buttons | Custom buttons |
|---|---|
 |  |
Go to (for Custom buttons): Menu → Configure screen → Custom buttons → Quick actions → three-dot menu → Appearance Go to (for a specific Default button): Menu → Configure screen → Buttons → Default buttons → select a button → Appearance
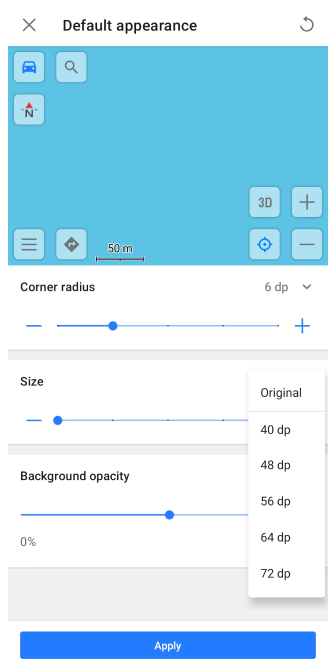
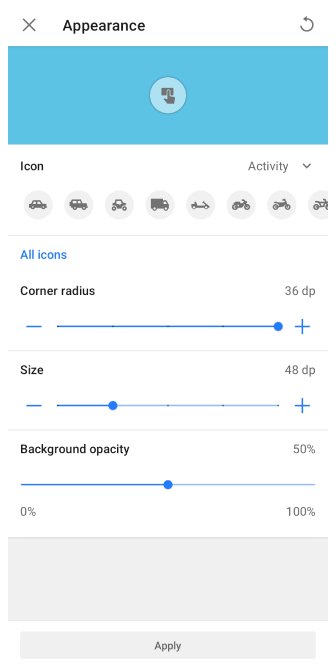
Customizing the appearance of buttons allows you to adjust the size, shape, icon, and background opacity for both Quick Action (Custom buttons) and Default buttons. On Android, appearance settings can be applied to all Default buttons or to a specific Default button, while on iOS they are available for specific Default buttons only.
Button icons can be set to:
- Dynamic – the icon changes based on the current action or state.
- Custom – choose an icon from your added actions.
- Specific – select a fixed icon that will always be displayed.
The Appearance screen includes a preview, allowing you to see how your changes will look on the map before leaving the settings.