Astronomie
This feature is currently not available for the iOS version of the OsmAnd app.
Astronomie bevindt zich momenteel in beta.
Overzicht
De Astronomie-plugin is een betaalde functie.
De Astronomie-plugin toont een hemeloverlay met sterren, sterrenbeelden, de Zon, de Maan en planeten direct op de kaart. Het gebruikt een offline hemelcatalogus om de huidige en toekomstige posities van hemellichamen te berekenen en weer te geven. De plugin stelt gebruikers ook in staat om de nachtelijke hemel te verkennen, objecten te identificeren en waarnemingen te plannen door hun banen over de hemel te bekijken.
De plugin werkt volledig offline met ingebouwde sterrencatalogi, waardoor hemelverkenning mogelijk is zelfs zonder internetverbinding.
Vereiste instelparameters
De volgende instellingen zijn vereist om de Astronomie-overlay weer te geven:
- Activeer de Astronomie-plugin vanuit het Plugins-gedeelte van het Hoofdmenu
- Gebruik Menu → Sterrenkaart om het speciale scherm met sterrenhemel, instellingen en tijdregelaars te openen.
- Selecteer tijd en datum met behulp van de regelaars op het Sterrenkaart-scherm.
- Pas aan wat er op de Sterrenkaart wordt weergegeven met behulp van Weergave configureren — bijvoorbeeld, schakel zichtbare objecten en weergavehulpmiddelen in of uit.
- Tik op de knop Sluiten (X) bovenaan het Sterrenkaart-scherm om de Sterrenkaart te verlaten en terug te keren naar de Aardekaart.
De plugin werkt met beide kaartweergavemotoren, maar presteert het beste in OpenGL-modus.
Sterrenkaart-scherm
Ga naar: Geactiveerde plugin → Menu → Sterrenkaart
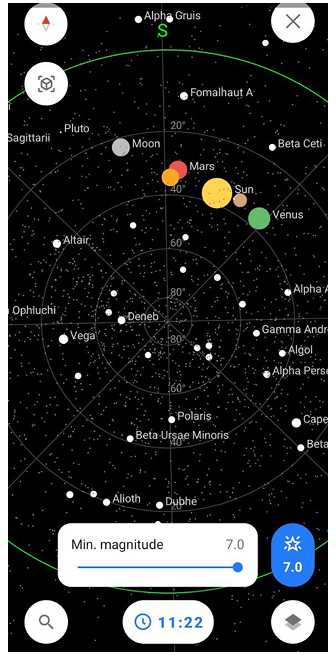
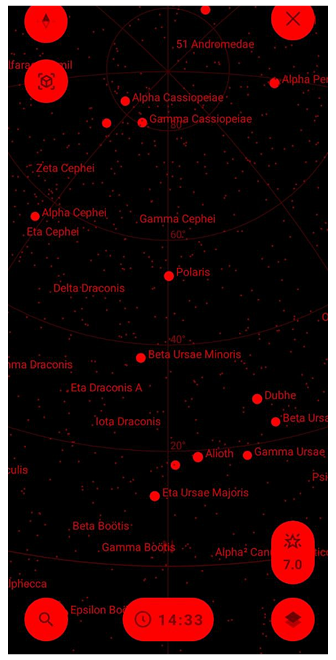
Het speciale Sterrenkaart-scherm toont een interactieve hemelkoepel met sterren, sterrenbeelden, planeten, Zon- en Maanbanen. Onderaan het scherm kun je toegang krijgen tot de volgende regelaars:
- Zoeken — opent het Zoekscherm waar je naar hemellichamen kunt zoeken en hemelcatalogi en categorieën kunt doorbladeren.
- Tijd en datum — laat je de datum en tijd wijzigen om de hemel op verschillende momenten in het verleden of de toekomst te observeren. Dit is handig voor het plannen van waarnemingen, het volgen van objectbewegingen of het leren hoe de hemel in de loop van de tijd verandert. Als je een aangepaste datum/tijd instelt, toont de chip de volledige datum en tijd, en verschijnt er een resetknop ernaast om terug te keren naar de huidige systeemtijd.
- Magnitude-filter — stelt je in staat om te beperken welke sterren worden weergegeven op basis van hun helderheid. Gebruik de schuifregelaar om de maximale groottewaarde in te stellen. Lagere waarden tonen alleen de helderste sterren, terwijl hogere waarden zwakkere sterren en deep-sky-objecten onthullen. Dit helpt om visuele rommel te verminderen of te simuleren wat met het blote oog zichtbaar is.
- Configureer weergave — opent weergave-instellingen die bepalen hoe objecten, banen en referentielijnen op de Sterrenkaart worden weergegeven.
Het scherm rendert de volledige hemisfeer boven je locatie, afgestemd op de kompasrichting. De Sterrenkaart kan handmatig worden gedraaid door het scherm te slepen. Handmatige rotatie van de Sterrenkaart beïnvloedt de oriëntatie van de Aardekaart niet. De Aardekaart volgt altijd de kaartoriëntatiemodus die is geselecteerd in je instellingen. Tik op hemellichamen voor details zoals grootte, opkomst/ondergangstijden of banen.
De Sterrenkaart kan ook afgestemd zijn op de oriëntatie van je apparaat wanneer de kompasmodus is ingeschakeld. In deze modus roteert de hemel volgens de accelerometer- en kompassensoren van het apparaat, waardoor je de hemel kunt verkennen door fysiek je telefoon te bewegen.
Contextmenu
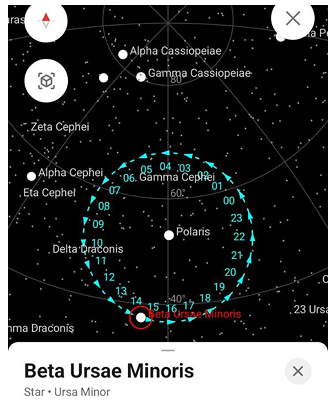
Het Contextmenu biedt gedetailleerde informatie over hemellichamen en hulpmiddelen voor het observeren ervan. Het opent wanneer je op een hemellichaam tikt op de Sterrenkaart.
Wanneer een object is geselecteerd, wordt het gemarkeerd op de Sterrenkaart met een rode cirkelmarkering. De dagelijkse beweging wordt ook gevisualiseerd door een uurcirkel (00–23), die aangeeft waar het object in de hemel zal verschijnen op elk uur van de lokale dag en de richting van de beweging.
Het Contextmenu verschijnt onderaan het scherm en bevat objectinformatie, snelle acties en tabbladen voor het verkennen van de zichtbaarheid en waarnemingsschema van het object.
Objectinformatie


Het bovenste gedeelte van het Contextmenu toont de naam en classificatie van het object. Onder de naam worden het objecttype en het bovenliggende sterrenbeeld of de groep weergegeven. Bijvoorbeeld:
- Beta Ursae Minoris — Ster • Ursa Minor
- Maan — Satelliet • Aarde
- Jupiter — Planeet • Zonnestelsel
Snelle informatieblokken tonen belangrijke waarnemingsparameters:
- Opkomst – de tijd waarop het object boven de horizon opkomt.
- Ondergang – de tijd waarop het object onder de horizon zakt.
- Azimut – de richting van het object ten opzichte van het noorden (0°–360°).
- Hoogte – de hoogte van het object boven de horizon.
- Magnitude – de helderheid van het object zoals gezien vanaf de aarde.
Deze waarden worden dynamisch bijgewerkt op basis van de geselecteerde tijd en de locatie van de gebruiker.
Onder de snelle informatieblokken kan het menu ook aanvullende informatie en bronnen over het object bevatten:
- Offline kennisbank – Maakt het mogelijk om een uitgebreide database met Wikipedia-artikelen en deep-sky-catalogi te downloaden voor offline gebruik. Na het downloaden kunnen gedetailleerde informatie over hemellichamen direct in de app worden bekeken zonder internetverbinding.
- [object Object] – Opent het Wikipedia-artikel over het object in de browser.
- Aanduidingen – Toont alternatieve namen en catalogusidentificaties voor het object (bijvoorbeeld HD, HIP, NGC). Deze sectie is beschikbaar voor objecten met catalogusvermeldingen, zoals sterren en deep-sky-objecten. Als het object geen algemene naam heeft, wordt een van deze aanduidingen gebruikt als primaire naam.
- Online foto's – Toont beschikbare foto's met betrekking tot het geselecteerde hemellichaam.
Acties
Onder de objectinformatie biedt het Contextmenu verschillende acties voor interactie met het geselecteerde hemellichaam:
- Opslaan – Voegt het object toe aan je Favorietenlijst voor snelle toegang.
- Lokaliseer – Centreert het geselecteerde object op de Sterrenkaart.
- Richting – Toont de richting naar het object op de kaart, om je te helpen oriënteren tijdens het observeren van de hemel.
- Baan – Toont de dagelijkse baan van het object over de hemel, zodat je kunt zien hoe het tijdens de dag beweegt.
Zichtbaarheidsgrafiek

Het tabblad Zichtbaarheid toont hoe het geselecteerde object over de hemel beweegt tijdens een periode van 24 uur.
De grafiek toont de hoogte van het object boven de horizon in de loop van de tijd.
- De horizontale as vertegenwoordigt de tijd van 12:00 tot 12:00 de volgende dag.
- De verticale as vertegenwoordigt de hoogte van −30° tot +90°.
De gekleurde curve toont de hoogte van het object gedurende de dag.
De achtergrond van de grafiek vertegenwoordigt de toestand van de hemel en verandert afhankelijk van de positie van de Zon. Dit helpt om te identificeren wanneer waarnemingen mogelijk zijn.
De kleuren vertegenwoordigen verschillende hemelomstandigheden:
- lichtblauw — dagtijd
- donkerder blauw — schemering
- donkerblauw / zwart — nacht
De kleur van de baan van het object weerspiegelt ook de hoogte:
- geel – hoog aan de hemel (beste zichtbaarheid)
- oranje – gemiddelde hoogte
- rood – dicht bij de horizon
- paars – onder de horizon (niet zichtbaar)
Een beweegbare indicator stelt je in staat om de positie van het object op verschillende tijdstippen te verkennen. Wanneer de indicator wordt verplaatst, worden de huidige tijd, hoogte en azimutwaarden bijgewerkt. De azimutwaarde bevat ook de bijbehorende kompasrichting (bijvoorbeeld 354° Az (N)).
Onder de grafiek worden belangrijke waarnemingsgebeurtenissen weergegeven:
- Opkomst – wanneer het object boven de horizon opkomt.
- Culminatie – wanneer het object zijn hoogste hoogte bereikt.
- Ondergang – wanneer het object onder de horizon zakt. Als het object nooit opkomt of nooit zakt, worden de bijbehorende waarden verborgen.
De grafiek opent met de indicator gepositioneerd op de huidige systeemtijd. De locatie die wordt gebruikt voor berekeningen, wordt onder de grafiek weergegeven als een stadsnaam.
Waarnemingsschema

Het tabblad Schema toont de zichtbaarheid van het geselecteerde object voor de huidige week. Elke rij vertegenwoordigt één dag en bevat:
- de dag van de week
- de datum
- opkomsttijd
- ondergangstijd. Als de ondergangstijd op de volgende dag valt, wordt deze gemarkeerd met ⁺¹
- een kleine zichtbaarheidgrafiek voor die dag
De minigrafiek toont wanneer het object gedurende de dag zichtbaar is en hoe de hoogte verandert. Het gekleurde gedeelte van de balk vertegenwoordigt de periode waarin het object boven de horizon staat. De minigrafiek vertegenwoordigt het tijdinterval van 00:00 tot 23:59 voor de geselecteerde dag.
Je kunt tussen weken navigeren met behulp van de pijltjestoetsen in de kop van het Schema. De kalenderknop stelt je in staat om terug te keren naar de huidige week.
AR-ster vinden (Camera-modus)
Ga naar: Geactiveerde plugin → Menu → Sterrenkaart → Cameraknop
De Astronomie-laag werkt met de camera van je apparaat om Augmented Reality (AR) sterrenkijken mogelijk te maken. Richt de camera van je telefoon op de echte nachtelijke hemel en zie sterren, planeten, sterrenbeelden, Zon/Maan overlegd in real-time.
Hoe AR-ster vinden werkt:
- Live camerabeeld toont echte hemel met transparante astronomische overlays afgestemd op horizon/kompas.
- Beweeg camera om hemel te scannen — objecten worden gemarkeerd wanneer ze in je gezichtsveld verschijnen.
- Tik op gemarkeerde objecten om azimut, hoogte, grootte, opkomst/ondergangstijden en Wikipedia-koppeling te zien.
- Kompaskalibratie vereist voor nauwkeurige uitlijning (zwaai telefoon in figuur-8 als nodig).
De AR-modus gebruikt apparaatssensoren (gyroscoop, accelerometer en kompas) om hemellichamen uit te lijnen met de echte hemel.
Perfect voor:
- Het identificeren van zwakke sterren/planeten die met het blote oog onzichtbaar zijn.
- Het lokaliseren van sterrenbeelden door de telefoon over de hemel te bewegen.
- Real-time hemelnavigatie tijdens wandelingen of kamperen.
Weergave configureren
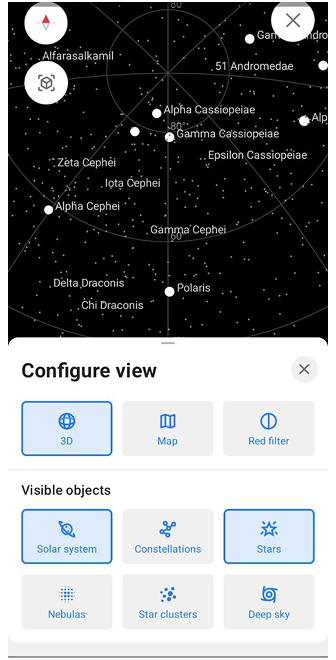

Configureer weergave stelt je in staat om te bepalen hoe de Sterrenkaart wordt weergegeven door visuele modi, objecten en weergavehulpmiddelen in of uit te schakelen.
Om Weergave configureren te openen, tik je op de knop Weergave configureren in de rechteronderhoek van het Sterrenkaart-scherm. De knop wordt weergegeven door een laagstijl-icoon (gestapelde vormen), dat weergave- en laaginstellingen aangeeft. Weergave configureren opent in een Half-stand, met de belangrijkste weergave-opties. Veeg het paneel omhoog om het uit te breiden naar Full-stand en toegang te krijgen tot alle beschikbare instellingen. Om Weergave configureren te sluiten, veeg je het paneel één keer omlaag om terug te keren naar de Half-stand, veeg je nog een keer omlaag om het volledig te sluiten, of tik je ergens op de kaart buiten het paneel. Je kunt ook op de knop Sluiten (X) in de rechterbovenhoek van het paneel tikken.
Modi en acties
Dit gedeelte regelt de belangrijkste weergavemodi van de Sterrenkaart.
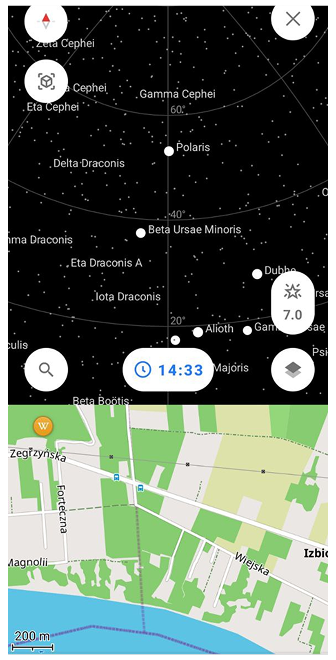
- 2D / 3D. Schakelt tussen een hemelbaanweergave (2D), die de hemel toont als een geprojecteerde koepel met objectbanen, en een bolvormige hemelweergave (3D) die de hemelbol vertegenwoordigt.
- Kaart. Schakelt een aanvullende Aardekaart-weergave in die onder de Sterrenkaart wordt weergegeven, zodat je hemellichamen kunt relateren aan je echte geografische omgeving.
- Roodfilter. Past een rood kleurfilter toe op het gehele scherm om lichtvervuiling te verminderen en nachtzicht te behouden tijdens waarnemingen in donkere hemels.
Zichtbare objecten


Dit gedeelte stelt je in staat om te kiezen welke typen hemellichamen op de Sterrenkaart worden weergegeven.
| Object | Beschrijving |
|---|---|
| Zonnestelsel | Toont de Zon, Maan en zichtbare planeten. |
| Sterrenbeelden | Toont sterrenbeeldlijnen en patronen gevormd door sterren. |
| Sterren | Toont individuele sterren die zichtbaar zijn op de Sterrenkaart. |
| Nevel | Toont nevelobjecten waar beschikbaar. |
| Sterrenhopen | Toont sterrenhopen als afzonderlijke hemellichamen. |
| Deepsky | Schakelt deep-sky-objecten in of uit, zoals sterrenstelsels, sterrenstelselclusters en zwarte gaten. |
Persoonlijke weergave-opties
Persoonlijke weergave-opties regelen aanvullende visuele hulpmiddelen met betrekking tot gebruikersfocus en waarneming.
| Optie | Beschrijving |
|---|---|
| Richting | Toont een richtingsindicator om je weergave te helpen oriënteren. |
| Dagelijkse baan | Toont de dagelijkse baan van geselecteerde hemellichamen over de hemel. |
| Favorieten | Markeert of toont objecten die als favorieten zijn gemarkeerd. |
Weergavehulpmiddelen
Weergavehulpmiddelen voegen referentielijnen en roosters toe om de Sterrenkaart te helpen oriënteren.
| Hulpmiddel | Beschrijving |
|---|---|
| Azimutaalraster | Voegt een azimutgebaseerd rooster toe voor horizontale hemeloriëntatie. |
| Meridiaanlijn | Toont de meridiaanlijn die de hemel van noord naar zuid doorkruist. |
| Equatoriaalraster | Toont het hemel-equatoriale coördinatenrooster. |
| Eclipticalijn | Toont de ekliptieklijn die de schijnbare baan van de Zon vertegenwoordigt. |
| Evenaarlijn | Toont de equatoriale projectie van de aarde op de hemelbol, om de rotatie van de aarde ten opzichte van de hemel te visualiseren. |
| Galactische lijn | Toont het vlak van de Melkweg over de hemel, dat de hoofdrichting van de galactische schijf aangeeft. |
Zoeken
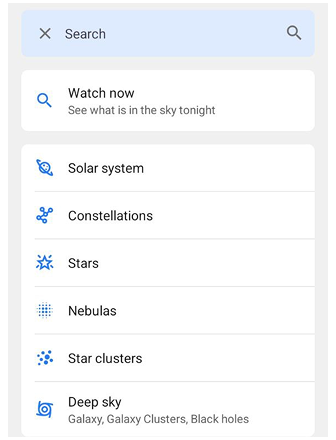
De Zoek-functie in de Astronomie-plugin stelt je in staat om hemellichamen te vinden, hemelcategorieën te verkennen en waarnemingsgegevens te openen. Om Zoeken te openen, tik je op de Zoekknop op de Sterrenkaart. Dit opent het Zoekscherm, dat verschillende secties biedt voor het ontdekken en organiseren van hemellichamen. Het Zoekscherm bevat de volgende secties:
1. Nu kijken
De sectie Nu kijken markeert hemellichamen die nu of vanavond zichtbaar zijn. Deze sectie fungeert als een aanbevelingshulpmiddel en toont objecten die het beste geschikt voor waarneming op basis van je huidige locatie en tijd.
2. Categorieën
De sectie Categorieën stelt je in staat om objecten te doorbladeren op type: Zonnestelsel, Sterrenbeelden, Sterren, Nevels, Sterrenhopen en Deep sky. Elke categorie opent een lijst met objecten met belangrijke informatie: objectnaam, type of sterrenbeeld, grootte (helderheid) en opkomst- of ondergangstijd (indien van toepassing).
Sorteren en filters
Tik op de zoekbalk om de volledige zoekinterface te openen. Je kunt resultaten verfijnen met sorteer- en filteropties.
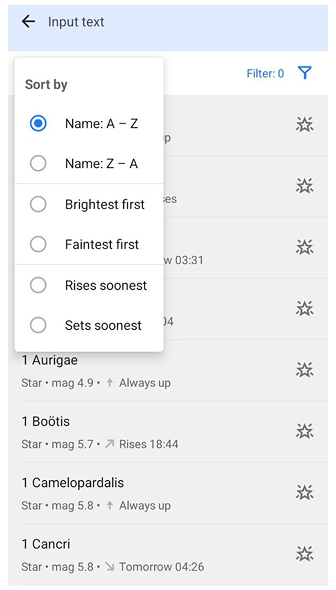
Je kunt objecten sorteren op:
- Naam (A–Z of Z–A)
- Helderste eerst
- Zwakste eerst
- Komt het eerst op
- Gaat het eerst onder
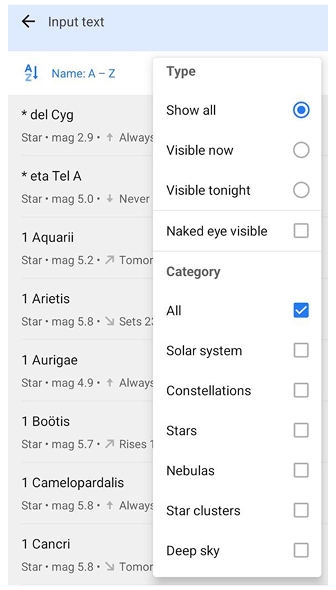
Filters helpen om zichtbare objecten te beperken.
Zichtbaarheid
- Alles tonen — toont alle objecten
- Nu zichtbaar — objecten momenteel boven de horizon
- Vanavond zichtbaar — objecten zichtbaar tussen zonsondergang en zonsopgang
Aanvullende filters
- Met blote oog zichtbaar — toont alleen objecten met grootte ≤ 6
Categorieën
Je kunt resultaten filteren op objecttype. Het selecteren van specifieke categorieën schakelt de Alle-optie automatisch uit.
Mijn gegevens

De sectie Mijn gegevens bevat objecten waarmee de gebruiker heeft geïnteracteerd. Deze sectie bevat drie lijsten:
- Favorieten — objecten opgeslagen vanuit het contextmenu.
- Dagelijkse baan — objecten waarvoor de dagelijkse bewegingsbaan is ingeschakeld.
- Richtingen — objecten met een actieve richtingsindicator op de Sterrenkaart.
Het selecteren van een item opent het contextmenu van het object.
Catalogi

De sectie Catalogi biedt toegang tot astronomische catalogi die beschikbaar zijn in de Astronomie-plugin.
Catalogi bevatten grote collecties hemellichamen zoals sterren, sterrenstelsels, nevels en sterrenhopen. Het openen van een catalogus toont een lijst met objecten die in die catalogus zijn opgenomen.